Git basics for TFS/TFVC users

Learning Git can be a bit challenging for developers with a background in centralized version control systems. But it doesn’t have to be that way.
Introduction
Git is becoming (or has already become, many would say) the de facto standard version control system of the industry. It was created in 2005 by Linus Torvalds to manage the source code from the Linux kernel, and since then its adoption has been growing phenomenally, specially after Github showed up.
However, even after all this time, there are some myths about Git that just won’t die. One of them is that Git is super hard to learn. From my experience, I can say that this isn’t true.
Git was meant to provide a lot of power and flexibility to its users. It certainly allows you to use it in more complex or sophisticate ways. But in practice, the basic commands you will use to get your daily work done are not that hard to learn.
That being said, Git’s learning curve may present some challenging to people that are used to centralized systems. I think it’s human nature to try to find patterns and to map concepts between what you already know and what you’re trying to learn; but there are significant differences and this “mapping” often results in frustration.
With that in mind, I’ve decided to write a series of posts to try to help developers who are coming from centralized systems (specifically TFS/TFVC) and trying to learn Git. I don’t intend by any means to exhaust the subject. Quite the opposite: when necessary, I’ll provide links for more in-depth explanations of certain topics.
A quick note about naming
TFS stands for Team Foundation Server. It is a Microsoft product that offers capabilities such as project management, requirement management, build automation and release management.
TFS also offers version control capabilities. Since TFS 2013 there has been native support for Git, but before that it was only possible by using TFS’s own version control system, which is called Team Foundation Version Control (TFVC).
So, TFS refers to the complete application life-cycle management solution. The version control system itself is called TFVC.
However, in this article I’ll be calling the version control system “TFS” since many developers colloquially call it that way.
Commit != Check-in
Being a centralized system, TFS presents a reasonably simple workflow, which usually consists of three steps:
- Get the most updated version of the source code;
- Make the necessary changes;
- Send the code with the changes back to the server.
So, you can see that the “check-in” command in practice has two meaning associated with it: “saving” changes and “sending” those changes to the server.
What I notice is that this notion of “I’m going to send my changes to the server” is a little bit hard to let go when you’re making the transition.
Remember: In Git there is no such thing as a central server.
What you have instead are remote repositories, usually called just remotes. You can have as much remotes as you want to. And they don’t necessarily have to be that remote. Yes, they could be on GitHub or something similar. But they could also be located on your coworker’s machine, on some network drive, or even on another folder in your own machine.
When your work in a team it’s common to set up a repository that is considered, for organization means, the official repository, which holds the code’s true and current state.
One more time: in Git doesn’t have a technical concept of a central repository; what’s described above is a convention.
With that in mind, let’s practice some Git commands so you can get used to them. Today we’re not seeing anything regarding remotes, server, nothing like that: just local commands.
Downloading and installing
Some people say that using Git on Windows used to be a pain. Fortunately, that isn’t the case anymore, as you’ll see.
First, download Git for Windows.
Double-click, next, next, you know the drill. There shouldn’t be a problem if you just choose all the default options. However, the following option might be useful:
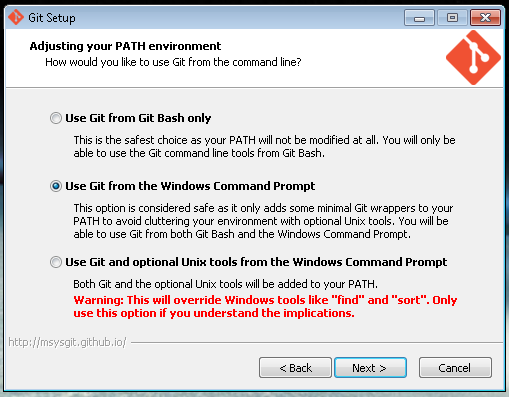
When you get to this screen, choosing the second option you allow you to use Git from the Windows command prompt, and not only from Git Bash.
Basic Configuration
After you’re done installing Git, it’s time to configure your identity, which consists in telling Git your name and email so it can associate them with each commit you make.
In order to do that, let’s use Git Bash. Locate “Git Bash” on Start Menu and run it. Git Bash’s window will be shown.
Type the following commands:
git config –global user.name “Your Name”
git config –global user.email “email@example.com”
There are a lot of other configurations available, but this is enough for you to be able to explore Git.
Creating your first repository
Using Git Bash, let’s create a folder and access it:
mkdir repo
cd repo
Now it’s time to create the repo:
git init
After running this command, you’ll see the following message:
Initialized empty Git repository in C:/Users/your-name/repo/.git/
Git Bash prompt should be showing you something like this:
User@Machine MINGW64 ~/repo (master)
Nothing mysterious: logged user, current location and current branch. In Git, the standard branch is called master. In the next post we’ll learn some basic operations in branches, but for now we’ll be using just master.
Some commands
OK, now you’ve got your repository, time to learn some commands. Let’s starting with one that you’ll probably use a lot: git status. This command allow you to visualize the current status of your repo.
When you run it you should see the following message:
On branch master
Initial commit
nothing to commit (create/copy files and use “git add” to track)
That is:
- current branch;
- which is waiting for your first commit;
- it shows what will go in the commit - which in this case is nothing, since we haven’t made any changes.
Git even tell us what the next possible step is, i.e. create or copy files and the use git add to track them (don’t worry for now about what this “tracking” thing means).
Let’s create a file.
echo test > arq1.txt
Run git status again and you’ll see that this time the message is different:
Untracked files: (use “git add
..." to include in what will be committed) arq1.txt
nothing added to commit but untracked files present (use “git add” to track)
Some new concepts here, starting with “Untracked files”. Git can see our new file but it will not include it in the next commit.
Again, Git tell us what to do next. Follow its advice and run the following command:
git add arq1.txt
Run git status again and look at the response:
Changes to be committed:
(use “git rm –cached
..." to unstage) new file: arq1.txt
For now ignore this:
use “git rm –cached
..." to unstage
Now we can see that the added file is ready to be commited. So, let’s do it!
git commit -m “First commit”
The command below creates our first commit. The -m parameter is used to specify a commit message, which is essential for understanding the history of the project.
git status again:
On branch master
nothing to commit, working directory clean
Let’s now edit our file. Open it using notepad or another text editor of your preference and add the following line:
adding a new line
git status again:
On branch master Changes not staged for commit: (use “git add
..." to update what will be committed) (use "git checkout -- ..." to discard changes in working directory) modified: arq1.txt
no changes added to commit (use “git add” and/or “git commit -a”)
The message is familiar, but slightly different from the the previous ones. As you’re probably expecting by now, she ends offering us a suggestion for the next step. Let’s follow the suggestion:
git add arq1.txt
As you can see, this is the same add command we’ve already used, when the file was still in the “untracked” phase. Even tough the command is the same, its meaning is slightly different here. We’ll cover this difference in the future as well.
Run git status again, message, you should know the drill by now:
Changes to be committed: (use “git reset HEAD
..." to unstage) modified: arq1.txt
The message is very similar with one we’ve already seen, but notice that our file now is in the “modified” stage, instead of “new file”, which makes perfect sense.
It’s not hard to guess what’s coming next:
git commit -m “Second commit: add second line”
To wrap things up, run git status and you’ll see a familiar message: working directory clean, nothing to commit.
Conclusion
I kept this article extremely simple, and that was by design. My intention was to show you some basic Git commands, so you can get the “feel” of what using Git is like.
Notice that there is an easily perceptible pattern in the commands we ran:
- you create an file
- “add it”
- commit
- edit it
- “add it”
- commit again
- and son on
Where I’ve wrote “add it”, you know I’m talking about the git add command. You might have noticed that this particular command has two different usages, which is clearly evidenced by the different messages that git status shows us after running it.
You’ve probably also noticed the different stags that a file can be in: “untracked”, “new file”, “modified”. they progress from one stage to the next one, like in a pipeline.
In the next article of the series we’ll go a little more deep in this issues. We’ll understand the different “areas” that exist in a Git repository. We’ll understand Git’s basic workflow, and the stages our files can be in.
We’ll also start to see one of the more important Git’s concepts: branches. We’ll see some common operations involving branches, and you’ll also learn how Git branches are different from those in TFS.
See you soon!
Found a typo or mistake in the post? Suggest edit ← C# 7 Features Worth Knowing - Part 1 C# 7 Features Worth Knowing - Part 2 →