C# Unit Testing: Getting Started With TDD

This post is part of a series. See all the articles in the series.
Today I bring you another post to help you get started with C# unit testing. I’ve already covered the basics of unit tests, explaining what they are and why they’re so important. After that, I showed you how to get started with unit testing with a practical example. Today, we go one step further, exploring the TDD methodology.
You’ve probably have heard of TDD, but you might be confused as to what it is. This isn’t your fault, by the way. There’s quite a lot of misconception surrounding this acronym. Some people even use it interchangeably with unit testing. In this post, you’re going to learn why they’re wrong, and more.
We start the post with a brief definition of TDD. You’ll learn not only that TDD stands for Test-Driven Development, but also that it’s not a testing technique, despite the name. After that, I explain what TDD is and what its benefits are.
After the “what” and “why” are both out of our way, we’ll be ready to have some fun. I’m going to show you, in practice, how to get started with TDD, developing a solution for a famous programming exercise. Sounds good? Then, let’s dig in.
C# Unit Testing & TDD Basics
I’ve mentioned earlier that TDD is not a testing technique. What is it, though? And how it’s related to C# unit testing (or unit testing in general, for that matter?)
Defining TDD
As you’ve seen, TDD stands for Test-Driven Development. It is a technique or methodology of software development that uses unit tests to drive the development of the application.
Instead of doing the more intuitive thing, which would be writing unit tests after the production code, the TDD methodology states that you should start by writing a failing unit test. Then you write the production code, but only what’s necessary to make the test pass.
I guess you’re now wondering at least two things:
- How does that work in practice?
- Why write code in such a weird way?
That’s what we’re going to see next.
The TDD Phases
Test-driven development relies on the repetition of an incredibly short cycle. This cycle is composed of three phases:
- First, you write a test that represents a specific requirement of the functionality you’re trying to implement.
- You then make the test pass, writing the minimum amount of production code you can get away with.
- If necessary, you refactor the code to eliminate duplication or other problems.
Since the functionality doesn’t exist yet, the test you write in step #1 will fail. That is, in languages such as Python or Ruby. In the case of statically typed languages such as Java or C#, the code won’t even compile. For our purposes, code not compiling counts as a test failure.
In step #2, you have to make the test pass, but nothing beyond that. What I mean is that your goal here isn’t to solve the problem, at least not yet. Instead, your only job is to make the test pass, writing the least possible amount of code. Cheating—for instance, returning a hard-coded value—is not only OK but encouraged, as you’ll soon see.
Finally, the third phase is the only one that allows you to write production code without having to create a failing test first. But you can’t create new classes or functions; you can only refactor the code you wrote in the previous step, to make it more readable, to eliminate duplication, or to solve another problem. And, of course, the test should still pass.
People often use refer to the TDD as “red-green-refactor” because most unit testing tools use red to denote failing tests and green for passing tests.
Why Use TDD?
The hard thing to understand when getting started with TDD isn’t the how. The “how” is trivial: write a test, make it pass, maybe refactor, rinse, repeat. The troubling part is the “why.” Why develop software in such a non-intuitive way?
I’ll talk more of the TDD philosophy in future articles. In a nutshell, applying TDD ensures you’ll have testable code from the beginning. It will encourage you to design your code in a simple and modular way.
But perhaps, the main advantage of TDD is increasing the developer’s confidence on their code. By developing one tiny step at a time, you’ll never be able to get a lot wrong, since you’re doing too little. Knowing that you’re only one failing test away from having working code is reassuring.
C# Unit Testing & TDD: The Hands-On Guide To Get Started
I’ve covered how to get started with C# unit testing in the past. I’ve also covered the required tools and how to get started. However, I won’t assume you’ve read those articles. Instead, I’ll cover everything from scratch. So, you’ll be able to follow the tutorial even if you have zero experience with unit testing.
Our Problem: The String Calculator Kata
For our tutorial, we’ll write a solution for Roy Osherov’s String Calculator kata. A coding kata is a programming exercise, meant to allow developers to practice fundamental agile software-engineering practices, such as refactoring, and—you’ve guessed it—TDD.
For simplicity’s sake, I’ll ignore some of the kata’s requirements. What follows are the requirements we’re going to use:
- We’re going to create a class called StringCalculator, with a single static method with the signature static int Add(string numbers);
- The method takes a string representing numbers separated by a comma, and return their sum.
- If we pass an empty string, the method should return zero.
- Passing a single number should result in the number itself.
- If we pass negative numbers, the method should throw an ArgumentException, with the message “Negative numbers not allowed:” followed by the negatives that were specified.
- The method should ignore numbers greater than 1000 should. So, “1,2,1000” should result in 1003, but “1,2,1001” should result in 3.
Creating The Production Project
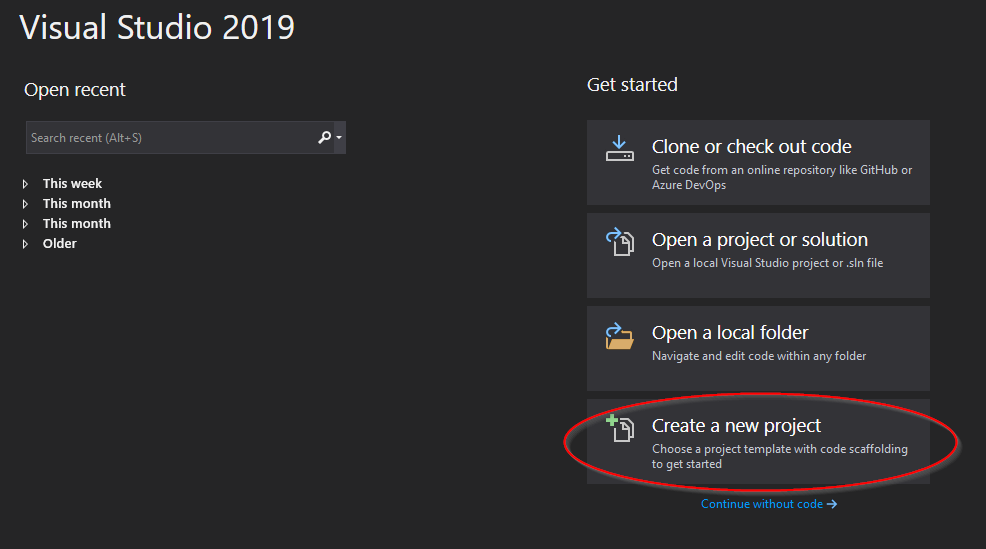
For this tutorial, I’ll be using the community edition of Visual Studio 2019. If you don’t already have it, you can download it and install it from free.
Open VS and click on “Create a new project,” like in the following image:
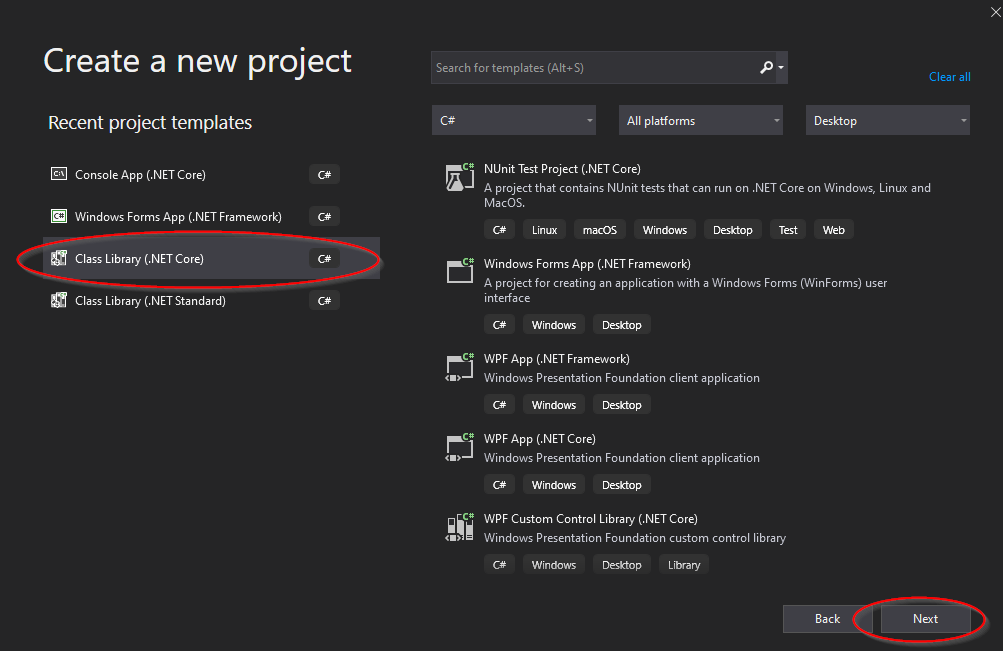
In the opened window, choose Class Library (.NET Core) as the template for the new project. Then, click on “Next”:
The next screen simply asks you for a name for the project and the solution. I chose” StringCalculatorKata” for both the project and the solution. You’ll also have to provide a location for saving the project files. When you’re done, just click “Create.”
If everything went well, you should see the default class open for you in Visual Studio. Go to Solution Explorer and delete that class; we’re not going to need it.
Creating The Test Project
Now, it’s time to create the test project. We could this in two ways: creating a regular “Class Library” project and then adding the necessary dependencies to it, or creating a unit test project right away. We’ll go with the latter since it makes the whole thing easier.
You know the drill: right-click the solution, go to “Add,” then “New Project…”. Then, choose the template “NUnit Test Project (.NET Core).”
Then, you’ll be required to provide a name and a location for the project. I like to follow the naming convention of naming the test project after the production project, with a “.Test” added. So, I pick “StringCalculatorKata.Test.” Finish the creation of the project.
If everything went right, you should now see a new class that looks like this:
public class Tests
{
    [SetUp]
    public void Setup()
    {
    }

    [Test]
    public void Test1()
    {
        Assert.Pass();
    }
}
Let’s do a few things. First, get rid of the Setup() method. We won’t need it. Then, add a new method with the code below:
[Test]
public void Test2()
{
    Assert.Fail();
}
So, we now have two tests, one that should pass and another that should fail. Let’s run them to see if they’re working correctly. Go to the “Run” menu and click on “Run All Tests.”
Now, open the Test Explorer window (View -> Test Explorer). It should look like this:
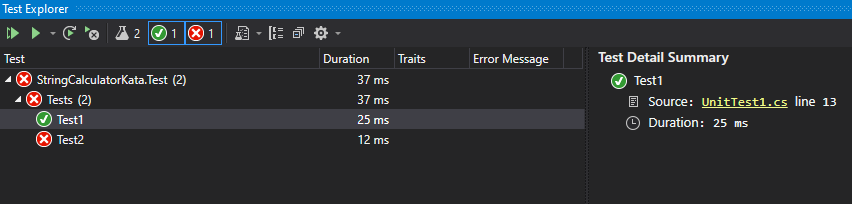
It looks like everything is working fine! But before we start doing our coding kata exercise, there are two final steps we need to take. First, let’s rename the test class. Go to the solution explorer, expand the unit test project, and delete its default test class. Then, right-click the test project, go to “Add,” then “New class…” and add a new class called “StringCalculatorKata.” Alternatively, you can rename the existing class.
The second thing we have to do is to ensure our test project can see our production project. To solve that, we’re adding a reference.
Go to the solution explorer again, right-click the test project, then go to “Add” and click on “Reference…”.
In the new window, select “Projects” on the left panel, and then select the StringCalculatorKata project, which should be the only one available:
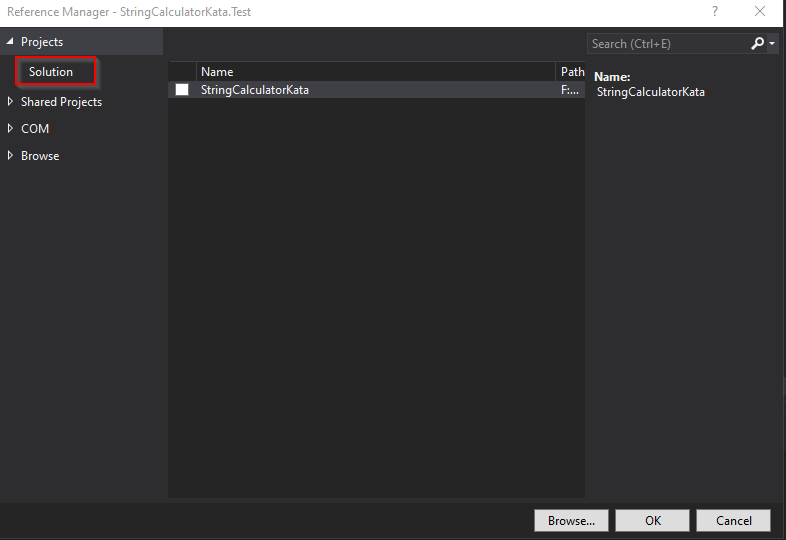
Then, you just have to click on “OK,” and now you’re ready to go.
Starting Our Coding Kata
Now, we’re ready to write our first failing test. So, open the StringCalculatorTest class and add the following method to it:
[Test]
public void Add_EmptyStringAsParam_ReturnsZero()
{
Assert.AreEqual(0, StringCalculator.Add(string.Empty));
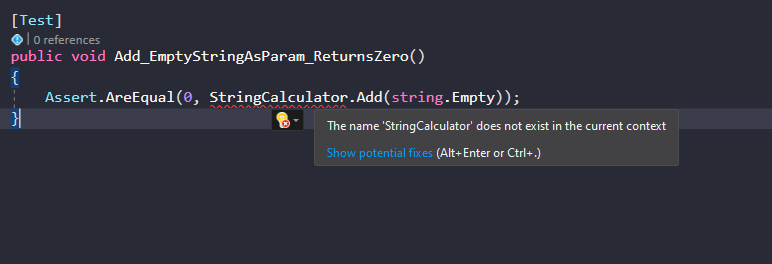
}In our first test case, we test the simplest possible scenario. That is, we call the Add method passing an empty string, which, according to the requirements you saw before, should result in 0. Of course, neither the Add method nor the StringCalculator class exists, so our code doesn’t even compile. Well, congratulations! You’ve successfully performed the first step in the red-green-refactor cycle by writing a failing test! Remember: in statically-typed languages such as C#, failure to compile counts as a failed test.
So, our first step is to get rid of the compilation error. If you hover over “StringCalculator,” you should see a little pop-up explaining the error and offering possible fixes:
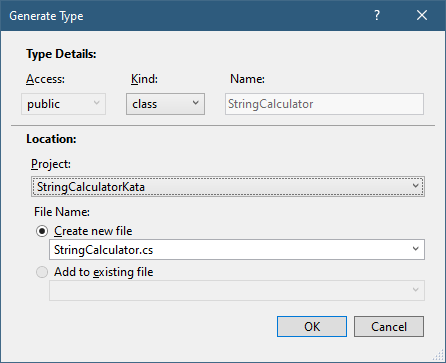
Click on “Show potential fixes” and then on “Generate new type…”. You should then see a window prompting you for the details and location of the new type. Change the “access” to “public” and the location to the production project, which is “StringCalculatorKata.” The window should look like this:
Click on “OK.” Now, if you open solution explorer and expand the StringCalculatorKata project, you should see the StringCalculator.cs class lurking around there. Cool.
However, our code still doesn’t compile. And that’s because, despite creating the production class, we didn’t add the Add method to it. So, let’s do it in the same way we did with the class.
Hover over the “Add” word until the help pop-up shows up with the message “’ StringCalculator’ does not contain a definition for ‘Add.’” Click on Show potential fixes, and then click on “Generate method ‘StringCalculator.Add’.”
You’ll see that the production class now contains a method called Add, with double as a return type. We want the method to return int, so let’s change that. Let’s also change the parameter name to “numbers” to match the coding kata’s requirements. At this point, your complete StringCalculator class should look like this:
public class StringCalculator
{
    public static int Add(string numbers)
    {
        throw new NotImplementedException();
    }
}
Now your code should compile. Run the test again, and you’ll see that it fails, with a message like this:
Add_EmptyStringAsParam_ReturnsZero
   Source: StringCalculatorTest.cs line 8
   Duration: 43 ms

  Message:
    System.NotImplementedException : The method or operation is not implemented.
  Stack Trace:
    StringCalculator.Add(String numbers) line 9
    StringCalculatorTest.Add_EmptyStringAsParam_ReturnsZero() line 10
We have a truly failing test. Are we ready to write production code? Not so fast. Sure, our test fails, but it fails in the wrong way. Since our test contains an assertion, we expected a failed assertion. Instead, what we’ve got is a failure due to the method under test throwing an exception.
The fix here is simple. Let’s just change the Add method, so it returns any number different from zero:
public static int Add(string numbers)
{
    return -1;
}
Now, run the test again, and you’ll see the error message is now this:
Add_EmptyStringAsParam_ReturnsZero
   Source: StringCalculatorTest.cs line 8
   Duration: 76 ms

  Message:
      Expected: 0
      But was:  -1
Making The Test Pass
We’re now finally ready to make the test pass. As I’ve said earlier, to make a test pass, you’re not only allowed but encouraged to cheat. In our case, we can simply make the Add method return zero:
public static int Add(string numbers)
{
    return 0;
}
Writing The Second Test: A Single Number
The requirements say that passing a single number should return the number itself. That’s sound like a useful thing to test:
[Test]
public void Add_StringContainingSingleNumber_ReturnsTheNumberItself()
{
    Assert.AreEqual(5, StringCalculator.Add("5"));
}
The test fails with the following message:
Add_StringContainingSingleNumber_ReturnsTheNumberItself
   Source: StringCalculatorTest.cs line 14
   Duration: 56 ms

  Message:
      Expected: 5
      But was:  0
How can we make the test above pass in the laziest possible way? How about this:
public static int Add(string numbers)
{
    if (numbers == string.Empty)
        return 0;

    return 5;
}
Testing Two Numbers
Since we’ve already tested the Add method by passing zero numbers (an empty string) and a single number, it feels like the next natural step for us now would be to write a test for the scenario of adding two numbers. So, let’s do just that.
[Test]
public void Add_TwoNumbersSeparatedByComma_ReturnsTheirSum()
{
    var numbers = "7,8";
    var expectedResult = 15;
    Assert.AreEqual(expectedResult, StringCalculator.Add(numbers));
}
The test above naturally fails since our method currently returns 0 when it gets an empty string and five otherwise. How can we change it, so this new test passes, the older tests continue to pass, in a way that doesn’t solve the problem generally?
This is an idea:
public static int Add(string numbers)
{
    if (numbers == string.Empty)
        return 0;

    if (numbers.Contains(','))
        return 15;

    return 5;
}
Testing Three Numbers
Have you noticed that, up until now, we haven’t done any refactoring? Well, we’re getting closer to the point when our tests drive us to include some nasty duplication to our code. Then, we’ll use refactoring to change the code in a way that gets closer to a general solution.
Let’s see if we can do that by testing the scenario with three numbers:
[Test]
public void Add_ThreeNumbersSeparatedByComma_ReturnsTheirSum()
{
    var numbers = "1, 2, 3";
    var expected = 6;
    Assert.AreEqual(expected, StringCalculator.Add(numbers));
}
The test will naturally fail. Since the provided string contains commas, we fall into the conditional branch that returns 15. Our challenge now is to change the production method in a way that makes this test pass. Can we do it without going to the general solution to the problem?Let’s see.
public static int Add(string numbers)
{
    if (numbers == string.Empty)
        return 0;

    if (numbers == "1, 2, 3")
        return 6;

    if (numbers.Contains(','))
        return 15;

    return 5;
}
By comparing the specified param with the exact input used in the test, we can make the test pass while avoiding going for the general solution. However, now we have managed to create code duplication. Can you see it? We’re making two comparisons against the value of numbers, one right after the other. Let’s see if we can get rid of that duplication.
public static int Add(string numbers)
{
    if (numbers == "1, 2, 3")
        return 6;

    if (numbers.Contains(','))
        return 15;

    int.TryParse(numbers, out int result);
    return result;
}
By leveraging the TryParse method from the System.Int32 type, I’ve managed to get rid of the first if instruction. We’ve also used a feature introduced in C# 7 called “out variables.” This feature allows us to use out parameters without having to declare them beforehand.
All tests still pass, so I can’t write more production code. What should the next test be?
Testing More Than Three Numbers
The requirements don’t say we should only be able to handle three numbers. So, let’s create another test case to cover the scenarios with 4, 5, or more numbers. While we’re at it, we can also include the requirement of ignoring numbers greater than 1000.
To do this without having to create a lot of test methods, we’re going to leverage NUnit’s parametrized tests feature, adding a single method with several test cases:
[TestCase("1,2,3,4", 10)]
[TestCase("8,7,20", 35)]
[TestCase("5,0,4,1001", 9)]
[TestCase("5,0,4,1000", 1009)]
[TestCase("26,6,90", 122)]
public void Add_MoreThanThreeNumbersSeparatedByComma_ReturnsTheirSum(
    string input, int result)
{
    Assert.AreEqual(result, StringCalculator.Add(input));
}
Notice that the third test case exemplifies the requirement that says we should ignore numbers greater than 1000. The next test case, however, shows that 1000 should not be ignored. If you run the tests, you’ll see that test explorer shows each test case as a distinct test.
How can we make this test pass? Honestly, by this post, it’s way easier to go for the correct implementation than it is to cheat. So, let’s do just that:
public static int Add(string numbers)
{
    var parts = numbers.Split(',');
    var result = 0;

    foreach (var part in parts)
    {
        int.TryParse(part, outint number);

        if (number <= 1000)
            result += number;
    }

    return result;
}
The code above should be easy to understand. We just split the string into parts using the comma as the delimiter. Then, for each part, we parse it to an integer, verify whether it’s equal or less than a thousand, and, if so, we add it to the result variable. Finally, we return the result.
We’re Not Done Yet
The requirements say that negative numbers shouldn’t be allowed. Let’s add a test for that! For brevity’s sake, we’ll add a single test method with several test cases, so we’re forced to go for the correct implementation right away:
[TestCase("1,2,3,4,5,-5")]
[TestCase("-1,1,2,9")]
[TestCase("5,6,8,-5")]
public void Add_StringContainingNegativeNumbers_Throws(string numbers)
{
    Assert.Throws<ArgumentException>(() => StringCalculator.Add(numbers));
}
For this test, we’re asserting not against a return value. Rather, we’re checking whether the method under test throws an exception.
Remember that the requirements say we should throw an exception with a message saying that negatives are not allowed. We should also include a list of the negatives that were passed. This will require some changes in our method:
public static int Add(string numbers)
{
    var parts = numbers.Split(',');
    var result = 0;
    var negatives = new List<int>();

    foreach (var part in parts)
    {
        int.TryParse(part, outint number);

        if (number < 0)
            negatives.Add(number);
        elseif (number <= 1000)
            result += number;
    }

    if (negatives.Count > 0)
    {
        var negativesList = string.Join(',', negatives);
        var exceptionMessage = $"Negative numbers not allowed: {negativesList}.";
        throw new ArgumentException(exceptionMessage);
    }

    return result;
}
As you can see, right at the beginning, we define a List<int> to store the negatives we find while iterating over all the numbers. Inside the loop, we verify whether the current number is negative. If it is, we add it to the list. If it isn’t, we verify whether it’s less than or equals to 1000, in which we case we add it to the result variable.
After the loop, we verify whether the negatives list has any elements. If it has, we create an exception message that includes the specified negatives and then throw a new ArgumentException. Otherwise, we return the result.
Conclusion
This post was a practical guide on how to get started with TDD in C#. So, where do you go from here?
Well, most things in life you learn by doing. Programming is certainly one of those things. So, if you want the concepts you’ve seen today to really sink in, you’ve got to practice.
The code I’ve written during this post is available as a public repository on GitHub. Go there, clone it using Git,, and start playing with it.
You’ll see that I created one commit for each step in the TDD cycle. That way, it becomes easier for future readers to visualize all the steps in the process by going through the project’s history, one commit at a time.
There are improvements that can be made to the code I shared today. For instance, the final Add method could be written in a shorter, clearer, more efficient way, using LINQ. You could add more test cases. Also, the kata requirements ask for a specific exception message in the case of negative numbers. Even though we’ve implemented the message as specified, we didn’t write a test for it. We could do that as part of your practice.
Finally, stay tuned to this blog. This post is part of a series, to which I intend to add more parts.
Thanks for reading, and until the next time!
Found a typo or mistake in the post? Suggest edit ← Null Is Evil. What's The Best Alternative? Null. Mutation Testing: What It Is and How It Makes Code Coverage Matter →