Unit testing for beginners - Part 2

Better late than later! Time to continue our series on unit testing for beginners. Today you’re going to write your first unit test.
Introduction
This post is part of a series. See all the articles in the series.
In the previous article you learned what unit tests are and what are the motivations for writing them.
Today you’re going to learn how to create unit tests. I’ll show you how to install and use the a unit test framework called NUnit. Together, we’re going to write some tests in order for you to know some of its features.
NUnit Installation
If you recall my previous article, you’ll remember that, in order to write and run unit tests, you need a unit testing framework.
The framework we’re going to use is NUnit, based on JUnit, which is a test framework for the Java language. There are other testing frameworks available in the .Net world, such as MS Test, developed by Microsoft itself. Feel free to try other frameworks later on.
Ok, let’s begin. For this project I’m going to use Visual Studio 2017. Download the Community version here.
Create a new solution of the Class Library type, with the name LearningUnitTesting.
Whenever I create a new solution on Visual Studio I delete the Class1 class that is created by default. You could rename it, of course, it makes no difference.
Now, let’s rename the default project to Application. This project will store the production code in our solution.
In the context of unit testing, we use the term Production Code when we’re talking about the “real code” in our application, in contrast to the Test Code we also write.
Next step! Now we create the test project. There are several different opinions regarding where should the test class be kept: along with production code, or in a different location. I usually create another project, which I name using the scheme [ProductionProject]Test.
So, the new project will be called ApplicationTest, and it’ll be of type Class Library as well. After creating the project, I delete the default class, same as before.
Your solution should look like this:

Let’s install NUnit. Fortunately, NUnit is available as a Nuget package, which makes its installation a breeze.
First, open the Package Manager Console. Go to: Tools > Nuget Package Manager > Package Manager Console.
Then type or copy-paste the following command:
Install-Package NUnit
Double-check that you’ve got the right project selected, like in the image:
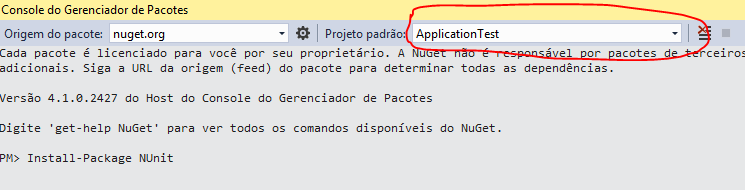
And then press ENTER. The installation will be done in a few seconds.
We are not done yet, though. We need to install another package, the NUnit Test Adapter, which we’ll let us run NUnit tests in Visual Studio. The process is the same, the only difference is the package’s name:
Install-Package NUnit3TestAdapter
Don’t forget to check if the right project is selected before pressing ENTER. The installation will be done in a few seconds.
This is it.
Creating and running the first test
Let’s create some tests. First, let’s add a new class to our production project. The class’s name will be Employee and its code will look like this:
I think the class is simple enough to not require additional explanation. Now, it’s time to create our test class. Add a new class called EmployeeTest to the ApplicationTest project.
This is another naming convention I like to use: to name the test class after the production class, adding the word Test at the end.
After the class is created, add the NUnit.Framework namespace to its using declarations. Then, create a new void returning public method called MyFirstTestMethod and add the [Test] attribute to it.
By now, your code should look like this:
The skeleton for the test is ready. It’s time for you to write your first assertion. In the context of unit testing, an assertion is an affirmation about how a unit of your system should behave. If the affirmation turns out to be true, we say the test has passed. In case it proves to be false, we say the test has failed.
In NUnit we use the Assert class to write our assertions. This class has a large number of methods that allow us to express our expectations about the behavior of our units.
Add the following line of code to the test method:
Assert.Pass();
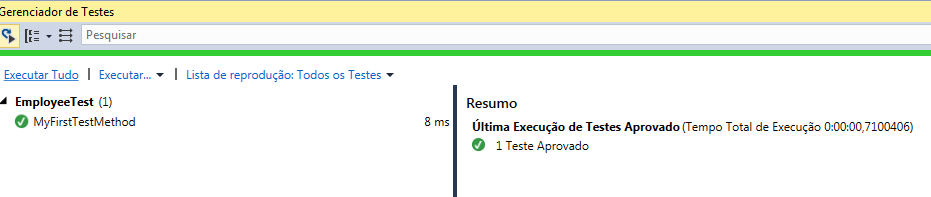
The Pass method, not surprisingly, just forces the test to pass. Now you’re going to run this test in order to see it passing. First of all, open the Test Explorer. Use the menu bar: Test > Windows > Test Explorer.
When the window is show, click on Run All. If everything goes right, you’ll see this:
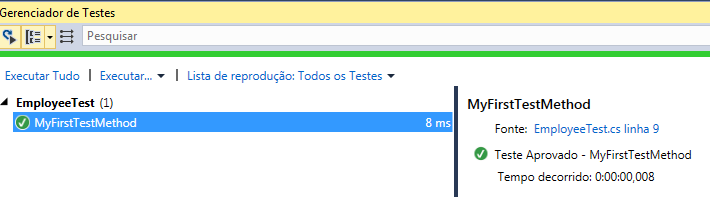
When you click on the test’s name, some additional information is shown, such as the test file and elapsed time:
Notice the use of green to indicate the test’s success.
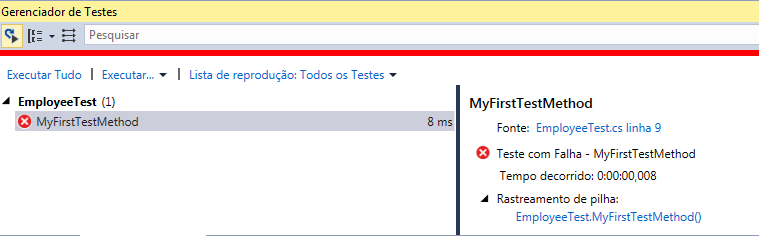
Now let’s do the opposite: force the test to fail. Replace the previous line for the following one:
Assert.Fail();
Run the test again and you’ll see the failure message, this time with the red bar:
Now that you’re getting the hang of it, we’re start testing our Employee class. Don’t forget to switch the test method back to Assert.Pass(), otherwise it will continue to fail.
Now add a new method called IntroduceMethodShouldWorkCorrectly. In this method we’ll create a new instance of Employee and verify that the Introduce method is working properly.
Before we do that, though, we must add a reference from the production project to our test project. Otherwise, our test class won’t be able to see the classes it is supposed to test!
To do that, right-click the ApplicationTest project, then go to Add, then Reference. In the opened window, choose the project, according to the following image:
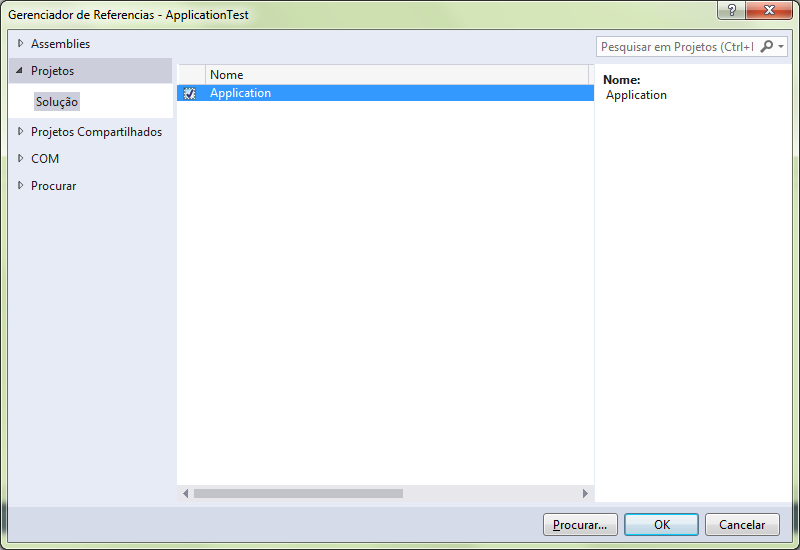
Then, click on OK.
Back to the test class. Edit the code so it looks like this:
You will notice that Employee is marked as an error. If you hover over it, you’ll see a message saying that the name Employee couldn’t be found and asking if there is some reference or using directive missing.
Of course there is a using directive missing, related to the reference we’ve just added. To fix this problem, just add the line using Application; to the namespace declarations, right at the start of the file.
Now that our code compiles, let’s go through this method, line by line.
In the first line, we create a new instance of Employee, specifying name, profession and salary. In the following line, we assign to a variable the value we expect the method to return. Then we assign to another variable the obtained result from the method.
Finally, we use the AreEqual method from the Assert class to verify the equality of the two values. This method is, probably, the one you’ll use the most during your tests.
Now it’s time to run the test. Use the shortcut CTRL + R, A or click on Run All in the Test Explorer window. If everything goes smoothly, you should see the green bar and the message indicating that both tests have passed.
Time to test our test! We’re going to deliberately ruin the Introduce method to see if the test fails as expected. Back to the production class, edit the method like this:
As you’ve seen, we’ve just removed the square brackets before and after “JobTitle”. This way, the string interpolation won’t work, hard-coding the string instead of replacing it by the value of the variable.
When we run the tests again, we got the following result:
Mensagem: Expected string length 48 but was 46. Strings differ at index 37. Expected: “Hi! My name is Alice and I work as a Programmer.” But was: “Hi! My name is Alice and I work as a JobTitle.” ————————————————^
As you can see, the message is very detailed. It not only lets us know that the strings differed, but it also tells us exactly where they differ. It also shows the expected string and what we really got. It is important to notice that the parameter’s orders in the AreEqual matters a lot, since it is used in the failure message.
The parameters’ order in the
AreEqualis very important. First specify the expected value, and then the actual result.
Great. Now you can switch the method back to the correct implementation and run the tests again, so the test can be green again.
As you can see, a unit test consists in a well defined sequence of steps: we prepare the scenario, then execute the action and verify the results. This sequence of steps, or phases, is sometimes called AAA: Arrange-Act-Assert.
A typical unit test has the three phases: Arrange-Act-Assert.
Even though there are another naming conventions for the phases of a unit test, we’ll adopt Arrange-Act-Assert , at least for now.
You may be wondering why I gave the name “sut” to the variable at the start of the method. This is a naming convention that I learned while reading Mark Seeman’s blog. SUT stands for System Under Test, i.e. the thing you’re testing.
There is nothing preventing you from naming the variable whatever you want. I really like to follow this convention, though, since it makes really clear what is being tested.
Tip: Try to use naming conventions that improve the readability of your code and make the author’s intention clear for anyone who reads the code.
Take a look at the same test method, but this time with comments delimiting each test phase:
Even though it isn’t really need, I suggest you use comments like the ones above to indicate the test phases, at least in the beginning of your learning.
Testing the GiveRaise method
A salary raise is always welcome, wouldn’t you agree? Let’s test the GiveRaise method to see if it’s working properly. Add the following method to your test class:
Run the test and you should see the familiar green bar. Did it work? Great. Time to test the test: we’re going to sabotage the implementation of GiveRaise and hope our test catches the error.
In the production class, edit the method this way:
Now the method is obviously wrong; the test should fail. Let’s run it?
Mensagem: Expected: 110 But was: 5m
Ok, as we can see, the test did fail. Switch the method back to the correct implementation.
One last test
Let’s say the Product Owner just showed up with a new requirement: the GiveRaise method should ignore negative raise rates. First, let’s edit the GiveRaise method to deal with this scenario:
We’ve just made a change in production code. Our top priority right now is to guarantee that we haven’t broken anything. Run the test to be sure that all of them are passing.
Everything still green? Great, let’s go ahead. Now we need to create a new test to document the “negative raise attempt” scenario.
Unit tests are also a type of documentation.
In the test class, add the following method:
Nothing really surprising here, right? At this point I’m sure you’ve already got this. So, now it is up to you to test the test: ruin the production code in one or more ways to see if the test fails as expected.
A quick recap
Today’s article was more dense than the previous one. We’ve managed to cover several topics::
- Installation of NUnit and NUnit Test Adapter;
- Creation of a test;
- Introduction to the
Assertclass; - Test execution, via Test Explorer and keyboard shortcuts;
- Reading and interpretation of test results;
- Phases of a unit test (Arrange-Act-Assert).
Besides these topics, we’ve also enlarged our test related vocabulary with terms like SUT, assertion and test code vs production code.
Some naming conventions were covered as well, for both classes and methods.
Last but not least, you’ve learned about the importance of seeing the test fail, and how we can gain confidence in our tests by deliberately sabotaging the production code.
Some notes
- You’ve probably noticed that my Visual Studio is not in English in the screen-captures. That is because I’m Brazilian and my Visual Studio is configured in Portuguese (and I first wrote this post in pt-br). I apologize for that.
- All of the code for today’s post can be found on Github.
- Once again, I thank my friend Gunter Italiano Ribeiro for proof-reading this post.
Conclusion
This was my second article in the series about unit testing. As I already mentioned, it is deliberately longer and more practical than the previous one. Still, all we’ve covered today is just the tip of the iceberg. Whole books were written about unit testing; by the way I’m indicating some in the following articles, along with more references.
For the tests we wrote today, we used the more intuitive - and probably more common - approach of creating the tests after the production code. However, many people and teams work differently: they write the tests before the production code.
I know it may sound strange, at first, but working this way can bring many benefits to your project. This and other topics will be covered in the next article.
Thanks for reading! See you soon.
Found a typo or mistake in the post? Suggest edit ← C# 7 Features Worth Knowing - Part 2 C# 8.0 Features: A Glimpse of the Future →