Git Bisect: An Introduction To Beginners
Photo by Yancy Min on Unsplash
If you’re trying to level up your git-fu, you could do worse than learn the git bisect command. Git has its (un)fair share of complicated commands, that’s true. The good news is that, unlike those, git bisect is quite easy to understand and use. The even better news is that it’s super useful to help you fix bugs.
Prerequisites
Before getting started, let’s review some prerequisites you’ll need to follow along with the post:
- Having git installed on your machine
- Knowing at least the basic git commands
- Having Node.js installed on your machine (later on you’ll use a sample application provided by me, and it’s written in JavaScript.)
Have all that? Great, let’s move on.
What’s Git Bisect? Why Do You Need It?
Git bisect is a command that enables you to perform a binary search on your commit history. Why do that?
Here’s a common scenario during development. Someone reports a bug. You go see it and find out that, two weeks ago, the feature was working just fine.
To fix the bug, it’d be useful to find out when exactly it was introduced to the codebase. Since you know one commit that you’re sure to be “good”—that is, it doesn’t contain the bug—you could git checkout your way there, going back one commit at a time and testing to see if the application works.
That’s bound to work, but it could potentially take a long time, depending on the number of commits you’d have to check and where the problem is. For those who remember your Computer Science classes, the approach described above is a linear search, which isn’t the most optimal way to search for a value within a list.
Do you know what’s more efficient? A binary search. If you have, say, 50 commits you need to check, and you test the 25th one and don’t find the bug, what does that mean? You can disregard the first 25 commits and continue your search within the 25 later ones. Continue the process, always partioning by half, and you’ll find the faulty one in way fewer checks than would be necessary with a linear search.
Doing this by hand would be super boring, though. And that’s where git bisect comes in handy. It has an easy syntax that allows you to specify both a good and a bad commit, and then git will perform the binary partitions on your behalf. At each step, you’ll have to test your application and inform git whether that commit is a bad or a good one. Then, git calculates the next step, takes you there, and the process ends when you find the culprit.
How To Use Git Bisect In Practice?
Time to learn how to use git bisect in a hands-on approach. To practice this command, you need a repo with at least some commits, and that has a bug. It’d take a while for you to set up a repository like this, so I already made one for you—yes, I’m nice like that.
Getting The Sample Application
Just clone this GitHub repo and you’re good to go.
The repo contains a silly toy JavaScript application that implements some rules from the String Calculator Kata by Roy Osherov. Here’s what the application is supposed to do:
- after running it, the application will prompt you for a list of numbers, separated by comma;
- you provide the numbers;
- the sum of the numbers is displayed.
- numbers larger than 1000 are ignored. So, the string “1,2,1000” should yield the result 1003, but “1,2,1001” should result in 3.
- negative numbers shouldn’t be allowed. If you enter one or more negative numbers, the application should throw an error with the message “Negatives not allowed”, followed by the negative numbers that were inputted.
After cloning the repository, let’s test the app. Access its folder via the command line, run node index.js and, when prompted for the numbers, enter “1,2,3” and press enter.
Oops.
node:internal/readline/emitKeypressEvents:74
            throw err;
            ^

Error: Negatives not allowed: .
    at C:\repos\git-bisect-intro\index.js:11:11
    at [_onLine] [as _onLine] (node:internal/readline/interface:423:7)
    at [_line] [as _line] (node:internal/readline/interface:886:18)
    at [_ttyWrite] [as _ttyWrite] (node:internal/readline/interface:1264:22)
    at ReadStream.onkeypress (node:internal/readline/interface:273:20)
    at ReadStream.emit (node:events:513:28)
    at emitKeys (node:internal/readline/utils:357:14)
    at emitKeys.next (<anonymous>)
    at ReadStream.onData (node:internal/readline/emitKeypressEvents:64:36)
    at ReadStream.emit (node:events:513:28)

Node.js v18.12.1
The app doesn’t work. It throws the “negatives not allowed” error even if no negatives were entered. If you want to see the app working, I made things easier for you: I created a tag called good-commit that references a point in the history guaranteed to be good. Just go there and check it:
git checkout good-commit
After running the command above, it’s possible you’ll see some messages about detached HEAD and stuff. Just ignore those. Run the application again, and voilá:
Enter a list of numbers separated by comma:
1,2,3
The sum of the entered numbers is 6.
Ok, let’s now test the numbers-larger-than-1000-should-be-ignored rule:
Enter a list of numbers separated by comma:
1,2,1000, 1001
The sum of the entered numbers is 1003.
Nice! As expected, the number 1000 is considered but 1001 is ignored. For a final test, let’s verify the negative numbers prohibition:
Enter a list of numbers separated by comma:
1,2,3,-5,-4,-7
node:internal/readline/emitKeypressEvents:74
            throw err;
            ^

Error: Negatives not allowed: -5, -4, -7.
Sweet. Now, for the next step. But first, run git checkout main to return to the latest commit.
Time To Roll-Up Your Sleeves
To start using the git bisect command, you need to begin a bisect session. You do this by simply running git bisect start. You’ll then see the following message:
status: waiting for both good and bad commits
Now, you have to tell git about a commit that’s known to be “good”—i.e. not contain the bug—and one commit that does contain the bug. Let’s start with the good one:
git bisect good good-commit
As I said before, I created a tag to point to a known good commit to make things easier for you. But you’re not restricted to tags when it comes to pointing to a commit for a bisecting session. Branch names will also work, as commit SHAs and pretty much any references that resolve to a commit.
Anyway, after running the command, you’ll see this:
status: waiting for bad commit, 1 good commit known
Now it’s time to point to a bad commit. I’m sure you’re able to guess the syntax now: git bisect bad <REFERENCE-TO-COMMIT>. But since the commit we’re at—in other words, the tip of main—is known to be bad, you can simply run:
git bisect bad
Now the fun begins! Git will display a message, showing you the status of the bisecting operation. It’ll tell you how many revisions are left to test , and how many steps that would take, and to which commit it has “transported” you:
Bisecting: 11 revisions left to test after this (roughly 4 steps)
[e159647d4d142c410894aaf10c1e11e2208848d7] Edit to negative rule
Your job now is to test the application and tell git whether that’s a good or bad commit. So, let’s run node index.js and provide some numbers:
Enter a list of numbers separated by comma:
1,2,3
node:internal/readline/emitKeypressEvents:74
            throw err;
            ^

Error: Negatives not allowed: .
I’ve cut some of the output for brevity, but anyway: the app’s not working. So, tell git that:
git bisect bad
It takes you to a different commit:
Bisecting: 5 revisions left to test after this (roughly 3 steps)
[0b8f71999bed054d8a95d9da3be6f0c831074cd7] Update README.md - Commit 6
Let’s repeat the test with node index.js:
Enter a list of numbers separated by comma:
1,2,3
The sum of the entered numbers is 6.
Awesome! At this commit, the app seems to work fine. Let’s do a different test, using negative numbers:
Enter a list of numbers separated by comma:
1,2,3,-5,-4,-10
node:internal/readline/emitKeypressEvents:74
            throw err;
            ^

Error: Negatives not allowed: -5, -4, -10.
Perfect: it’s throwing an error, as it’s supposed to do in this scenario. So, run git bisect good to mark this commit as good.
Bisecting: 2 revisions left to test after this (roughly 2 steps)
[e6413a915c7ca92871394b01a8497c8df3fc46ae] Update README.md - Commit 9
Yet another commit, yet another test:
node index.js
Enter a list of numbers separated by comma:
1,2,3
The sum of the entered numbers is 6.
Let’s test the negatives:
node index.js
Enter a list of numbers separated by comma:
10,20,-5
node:internal/readline/emitKeypressEvents:74
            throw err;
            ^

Error: Negatives not allowed: -5.
Everything looks fine, let’s mark it as good:
git bisect good
And the result:
Bisecting: 0 revisions left to test after this (roughly 1 step)
[053207649aefdb09cd255567df673cadbe2e38e3] Restore README
We’re getting close! Let’s test:
node index.js
Enter a list of numbers separated by comma:
1,2,3
The sum of the entered numbers is 6.

node index.js
Enter a list of numbers separated by comma:
1,2,3,-5,-6
node:internal/readline/emitKeypressEvents:74
            throw err;
            ^

Error: Negatives not allowed: -5, -6.
Marking it as good: git bisect good. And, voilà, here’s our answer:
e159647d4d142c410894aaf10c1e11e2208848d7 is the first bad commit
commit e159647d4d142c410894aaf10c1e11e2208848d7
Author: Carlos Schults <carlos.schults@gmail.com>
Date:   Tue Jan 9 08:53:47 2024 -0300

    Edit to negative rule

 index.js | 2 +-
 1 file changed, 1 insertion(+), 1 deletion(-)
What Now?
Ok, now you know that the commit e159647d4d142c410894aaf10c1e11e2208848d7 is the one that introduced the bug. What should you do now?
In short, you need to see details of this commit, to learn what changes it makes so you can understand what caused the problem. Let’s use the git show command for that:
git show e159647d4d142c410894aaf10c1e11e2208848d7
This command will output several things about the commit, including author, date, and message. I’ll reproduce only the part I’m interested in, which is the diff:
diff --git a/index.js b/index.js
index 5f351e0..4e65e0c 100644
--- a/index.js
+++ b/index.js
@@ -6,7 +6,7 @@ const readline = require('readline').createInterface({
   readline.question('Enter a list of numbers separated by comma:\n', numbers => {
     let integers = numbers.split(',').map(x => parseInt(x) || 0);
     let negatives = integers.filter(x => x < 0);
-    if (negatives.length > 0) {
+    if (negatives.length >= 0) {
       throw new Error(`Negatives not allowed: ${negatives.join(', ')}.`);
     }
And now as an image, so you can see the colors:
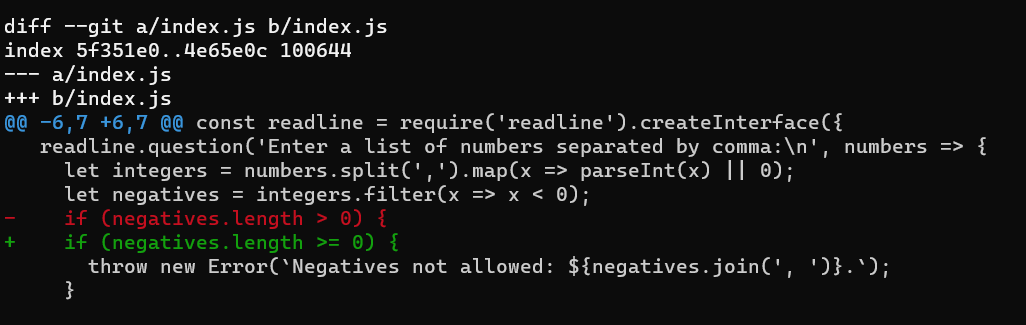
As you can see, this commit made a change to the if statement that tests for negative numbers, adding an equals sign to the comparison. That way, the error will be thrown regardless of whether the negatives array has elements.
Now that you know how the bug was introduced, it’s super easy to fix it. To end the bisect session, just run git bisect reset. That way, you’ll be back to the point in which you originally started.
A Note About “Good” and “Bad”
Astute readers will have noticed that, although this command uses terms like “goo”,’ “bad,” and “bug,” there’s nothing stopping you from using git bisect to find out the point in time at which any property of the codebase has changed. After all, Git can’t know how your application is supposed to work; it was you, the whole time, who was testing it.
Even the documentation for the command acknowledges this fact:
Sometimes you are not looking for the commit that introduced a breakage, but rather for a commit that caused a change between some other “old” state and “new” state. For example, you might be looking for the commit that introduced a particular fix. Or you might be looking for the first commit in which the source-code filenames were finally all converted to your company’s naming standard. Or whatever.
In such a scenario, it’d be weird to use the terms “good” and “bad”. The good news is that you can use “new” and “old” instead: the new commit is one that contains the property you’re looking after, and the old doesn’t contain such property.
To use this terminology, just start a bisecting session as usual, and then run git bisect old <COMMIT> to indicate the old commit, and git bisect new <COMMIT> to indicate the new one.
Keep in mind that you can either use good/bad or old/new, but not mix the two. At any point during a session, you can run git bisect terms to be reminded of the terms you’re using.
The command is even more flexible than that: you can pick your own terms! Just start a session by running the following:
git bisect start --term-old <term-old> --term-new <term-new>
Git Bisect: Where Do You Go Now?
I know this is only anecdotal data but, from my observations, I’d say that git bisect is an underused command. Which is pretty sad, considering that git bisect is a)incredibly useful and b)easy to understand and use, at least in its most basic use case.
If you’re already comfortable with the most common git commands — i.e. status, log, commit, add, pull, push, checkout — and want to go one step higher, learning git bisect is a great place for you to start.
So, you’ve learned the basics of this command with the introduction I wrote. Awesome, but where should you go from here? I’ve got a few suggestions:
- Put it into practice ASAP. Even if you’re not bug-hunting right now, come up with some characteristic of your application and find the commit in which it was introduced using
git bisect. - Dive depeer into the command and look for more advanced use cases. For instance, it’s possible to automate
git bisectso you don’t even have to manually test in order to triage the good commits from the bad ones! - Read the documentation for
git bisect. Keep going back to it from time to time, and you’re bound to learn something new and useful.
That’s it for this post. I hope you like it, and I really appreciate any feedback. Thanks for reading!
Found a typo or mistake in the post? Suggest edit ← The 5 Levels of Readable Code The LINQ Join Operator: A Complete Tutorial →